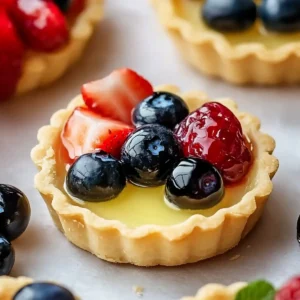
When summer berries are bursting with flavor, and the sun is shining just right, nothing feels more satisfying than whipping up a batch of Mini Fruit Tarts. These delightful little treats remind me of picnics in the park, where friends gather around a blanket, sharing laughter and sweet bites. The crispy tart shell, a lovely creamy filling, and a vibrant array of fresh fruits come together to create a dessert that’s as visually stunning as it is delicious.

Jump to:
I stumbled upon this recipe during a lazy Saturday afternoon, and it turned out to be a game-changer. Perfect for those who crave the homemade touch yet want something that feels effortless, these tarts are a delightful solution to any dessert dilemma. So, whether you’re surprising family after dinner or looking to impress at your next gathering, these Mini Fruit Tarts are sure to be a crowd-pleaser. Let’s dive into this simple yet elegant recipe that will transform your fruit-filled dreams into a reality!
Why You'll Love This Mini Fruit Tarts
- These Mini Fruit Tarts are incredibly easy to make, allowing you to whip up a delicious dessert in just 35 minutes.
- The combination of the crisp tart shell, creamy filling, and fresh fruits creates an explosion of flavors that will delight your taste buds.
- Their versatility shines as you can customize the toppings with your favorite seasonal fruits, making them perfect for any occasion.
- Visually stunning and vibrant, these tarts are sure to impress your guests and become the star of any dessert table.
Mini Fruit Tarts Ingredients
• Get ready to whip up some deliciousness!
For the Tart Shell
• All-purpose flour – helps create a crisp yet tender base for the tarts.
• Unsalted butter – ensures a rich flavor and flaky texture; be sure to use cold butter for best results.
• Granulated sugar – adds a hint of sweetness to balance the flavors.
• Salt – enhances the overall taste by rounding out the sweetness.
• Ice water – adds moisture to the dough; just enough to bring it together without making it sticky.
For the Cream Cheese Filling
• Cream cheese – provides a creamy and tangy filling that perfectly complements the fresh fruits.
• Powdered sugar – sweetens the filling without additional graininess.
• Vanilla extract – elevates the flavor profile with a warm, sweet aroma.
For the Topping
• Assorted fresh fruits – a colorful mix like berries, kiwi, and peaches will make your Mini Fruit Tarts a feast for the eyes and taste buds.
• Fruit glaze (optional) – adds a shiny finish and enhances the dessert’s sweetness; homemade or store-bought works great!
Now you’re all set to create these delightful Mini Fruit Tarts that are sure to bring joy to any gathering!

How to Make Mini Fruit Tarts
Preheat the oven by setting it to 350°F (175°C). This prepares the perfect environment for your tarts, ensuring they bake evenly and achieve that lovely golden color.
Mix the ingredients together! In a bowl, combine the all-purpose flour, unsalted butter, granulated sugar, and salt. Stir until the mixture becomes crumbly, then add 2-3 tablespoons of ice water until the dough forms.
Press the dough into mini tart pans. Evenly distribute the mixture and use a fork to poke holes in the bottom, preventing bubbling during baking.
Bake for 20 minutes or until the crust is golden brown. Keep an eye on them; you want that perfect crunchiness to complement the creamy filling.
Beat the cream cheese filling in a separate bowl. Combine cream cheese, powdered sugar, and vanilla extract until the mixture is creamy and smooth, yielding that fluffy texture that’s simply irresistible.
Fill each cooled tart shell with the cream cheese mixture. Make sure to fill them generously, but leave a little space for those colorful fruit toppings!
Top the tarts with your assortment of fresh fruits. Create a beautiful arrangement with your favorites, and if you like, drizzle a touch of fruit glaze over the top for that extra flair!
Optional: Garnish with a sprig of mint for a fresh pop of color.
Exact quantities are listed in the recipe card below.
Make Ahead Options
These Mini Fruit Tarts are a fantastic treat to prepare in advance, perfect for busy weeknights or special gatherings! You can make the tart shells up to 3 days in advance; simply bake them, cool completely, and store them in an airtight container at room temperature to maintain their crispiness. The cream cheese filling can also be prepared up to 2 days ahead; just store it in the refrigerator in a tightly sealed container. When you’re ready to serve, fill the tart shells with the cream cheese mixture, top them with your colorful assortment of fresh fruits, and drizzle with fruit glaze if desired. This way, you’ll enjoy all the delightful textures and flavors of your Mini Fruit Tarts with minimal last-minute effort!
What to Serve with Mini Fruit Tarts?
Elevate your dessert experience with delightful sides that complement these sweet and creamy treats.
Fresh Mint Tea: This refreshing herbal tea enhances the tarts’ fruity notes while providing a soothing finish to your meal. A dash of honey can add a touch of sweetness.
Light Salad: A vibrant mix of arugula and citrus fruits balances the tarts’ sweetness, making it a perfect contrast that awakens the palate. Drizzle with a light vinaigrette for added zest.
Vanilla Ice Cream: The creamy, rich flavor of vanilla ice cream pairs wonderfully with the crispy tart shells, melting slightly over the warm crust for a heavenly treat that offers contrast.
Whipped Cream: A dollop of lightly sweetened whipped cream adds a luxurious texture, enhancing the tarts with a pillow of airy goodness that complements the fruit beautifully.
Sparkling Water with Lime: This fizzy drink refreshes your palate and adds a lively effervescence that pairs perfectly, cutting through the richness of the cream cheese filling.
Dark Chocolate Shavings: A sprinkle of dark chocolate shavings not only elevates the visual appeal but also provides a bittersweet flavor that complements the freshness of the fruits.
Berry Compote: Drizzling a warm berry compote adds a layer of fruitiness that’s both comforting and indulgent, enhancing the flavor of each mini tart with an additional fruit burst.
Coffee or Espresso: The rich and bold flavors of coffee or a shot of espresso serve as a delightful wake-up call to your taste buds, cutting through the sweetness of the tarts and providing a perfect end to your meal.
Mini Fruit Tarts Variations
Feel free to get creative with these suggestions and make the recipe uniquely yours!
Gluten-Free: Substitute all-purpose flour with a gluten-free blend to enjoy tarts without the gluten guilt!
Dairy-Free: Use coconut cream instead of cream cheese for a luscious filling that brings a tropical twist.
Sweetener Swap: Try using honey or maple syrup in place of powdered sugar for a natural sweetness and rich flavor.
Flavor Infusion: Add a teaspoon of lemon zest to the cream cheese filling for a zesty kick that brightens every bite.
Nutty Addition: Fold in some finely chopped nuts, like walnuts or almonds, into the filling for added crunch and a delicious contrast.
Chocolate Drizzle: Drizzle melted dark chocolate over the fruits for an indulgent touch that balances sweetness with rich cocoa flavor.
Spiced Route: Add a pinch of cinnamon or nutmeg to the tart dough for a warm, aromatic note that complements the fresh fruits beautifully.
Fruity Glaze: Swap out store-bought fruit glaze for a homemade version by simmering fruit juice with a bit of cornstarch for a fresh, vibrant topping!
Let your imagination run wild! With these variations, you’re set to create Mini Fruit Tarts that are perfect for any occasion. Enjoy the journey of flavors!
How to Store and Freeze Mini Fruit Tarts
Room Temperature: Keep the tarts at room temperature for up to 2 hours. After this time, they should be covered and refrigerated to maintain freshness.
Fridge: Store leftover Mini Fruit Tarts in an airtight container in the fridge for up to 3 days. This helps preserve the creamy filling and keeps the fruit vibrant.
Freezer: If you want to freeze the tarts, it’s best to freeze the tart shells separately without the filling or fruit. Once cooled, wrap them tightly in plastic wrap and store in a freezer-safe bag for up to 2 months.
Reheating: When ready to eat, let the tart shells thaw in the fridge overnight, then fill with the cream cheese mixture and fresh fruit just before serving for the best texture and flavor.
Chef's Helpful Tips
- For perfect Mini Fruit Tarts, ensure your butter is cold when mixing the dough to achieve a flaky texture.
- Avoid overworking the dough; mix just until combined to prevent tough crusts.
- When filling the tarts with cream cheese mixture, use a piping bag for a neat and even distribution.
- Allow the tart shells to cool completely before adding the filling to prevent it from melting.
Mini Fruit Tarts Recipe FAQs
How do I choose the best fruits for my Mini Fruit Tarts?
Absolutely! When selecting fruits, look for ones that are ripe and in-season for the best flavor. Berries should be plump and vibrant, while kiwi and peaches should have a slight give when gently pressed. Avoid fruits with dark spots or signs of overripeness to ensure your tarts look and taste their best!
What’s the best way to store leftover Mini Fruit Tarts?
You can store leftover Mini Fruit Tarts in an airtight container in the refrigerator for up to 3 days. This keeps the creamy filling fresh and the fruits vibrant. If you’re worried about sogginess, you may want to store the tart shells and filling separately, adding the fruits just before serving.
Can I freeze Mini Fruit Tarts?
Certainly! However, the best approach is to freeze the tart shells separately, without the filling or fruit. Once they’re completely cool, wrap them tightly in plastic wrap and place them in a freezer-safe bag. They will keep well for up to 2 months. When you’re ready to serve, allow the shells to thaw in the refrigerator overnight, then fill them with the cream cheese mixture and top with fresh fruits.
What should I do if my tart shells are too tough?
If your tart shells turn out tough, it’s often due to overmixing the dough. For next time, mix just until the ingredients are combined, ensuring not to handle the dough too much. Also, remember to keep your butter cold; this can help create a tender, flaky crust!
Are there any dietary considerations for Mini Fruit Tarts?
Very! If you need gluten-free options, you could substitute all-purpose flour with a gluten-free flour blend. For those with dairy allergies, consider using a dairy-free cream cheese alternative and check that your fruit glaze is also dairy-free. Always double-check ingredient labels to ensure compatibility with dietary needs.
Can I make Mini Fruit Tarts ahead of time?
Definitely! You can prepare the tart shells a day or two in advance; just make sure to store them in an airtight container at room temperature. Prepare the cream cheese filling and wash your fruit on the day of serving to keep everything fresh and delicious. This makes entertaining a breeze and allows more time for enjoying good company!

Mini Fruit Tarts
Ingredients
Equipment
Method
- Preheat the oven to 350°F (175°C).
- In a bowl, mix the flour, butter, sugar, and salt until crumbly, then add ice water until the dough forms.
- Press the dough into mini tart pans, poking holes in the bottom.
- Bake for 20 minutes or until golden brown.
- In a separate bowl, beat the cream cheese, powdered sugar, and vanilla until smooth.
- Fill each cooled tart shell with the cream cheese mixture, leaving space for fruit.
- Top with fresh fruits and drizzle with fruit glaze if desired.